
'%20x='0'%20y='0'%20height='100%25'%20width='100%25'%20%0A%20%20%20%20%20%20%20%20%20%20xlink%3Ahref='data:image/jpg;base64,/9j/2wBDAAYEBQYFBAYGBQYHBwYIChAKCgkJChQODwwQFxQYGBcUFhYaHSUfGhsjHBYWICwgIyYnKSopGR8tMC0oMCUoKSj/2wBDAQcHBwoIChMKChMoGhYaKCgoKCgoKCgoKCgoKCgoKCgoKCgoKCgoKCgoKCgoKCgoKCgoKCgoKCgoKCgoKCgoKCj/wgARCAAGAAoDASIAAhEBAxEB/8QAFgABAQEAAAAAAAAAAAAAAAAAAAQF/8QAFQEBAQAAAAAAAAAAAAAAAAAABAX/2gAMAwEAAhADEAAAAINQlJ//xAAhEAABAwMEAwAAAAAAAAAAAAACAQQFAAMiBgcSIzJCUf/aAAgBAQABPwCC0s5NhYsI4bgEi2XsEM0FCXy+rR7LyNolAZwOI4+1f//EABkRAAIDAQAAAAAAAAAAAAAAAAIDAAEEIf/aAAgBAgEBPwBmhgly5//EABgRAAIDAAAAAAAAAAAAAAAAAAABAhMx/9oACAEDAQE/AKYNYf/Z'%3E%3C/image%3E%3C/svg%3E)
Memortis Shore Ruins of Time in Honkai Star Rail is a new explorable area that was released alongside version 3.7. Like the treasure chests and Golden Scapegoat puzzles, the map features several Creation Nymphs that players might want to find. Upon collecting all, Trailblazers will be rewarded with some Stellar Jade and in-game materials.
This article lists every Creation Nymphy location in Memortis Shore Ruins of Time in Honkai Star Rail.
Every Nymph location in Memortis Shore Ruins of Time in Honkai Star Rail
Memortis Shore Ruins of Time F1 Nymph locations

Looking for Crossword hints & solutions? Check out latest NYT Mini Crossword Answers, LA Times Crossword Answers, and Atlantic Crossword Answers
- Nymph 1: Teleport to The Ruins' Courtyard Space Anchor in Memortis Shore Ruins of Time in Honkai Star Rail. Turn around and go behind the giant statue. You will see the first Nymph on the door, beside a treasure chest.
- Nymph 2: From the last location, turn around the follow the path. After walking for a bit, you will see the second Nymph on a broken structure.
- Nymph 3: Continue to walk on the same path you were following. After taking a right turn, you will see a building with a small room. Break the lion mask to catch the third Creation Nymph.

- Nymph 4: Now, teleport to the Grave of Clarity anchor. Head straight toward the tree branch where you'll see the Nymph behind it.
Also read - Best Cyrene build in Honkai Star Rail: Light Cones, Relics, stats, teams, and more
Memortis Shore Ruins of Time B1 Nymph locations

- Nymph 1: Teleport to the Sealed Prison of Despair anchor. Turn around the use the moving platform to go to the other side. After doing so, go up the stairs and right before going inside the room, turn right. Use the elevator to go to the B1 floor. Now just follow the path until you reach the open area. The Nymph is of the first tree branch.
Memortis Shore Ruins of Time B2 Nymph locations

- Nymph 1: Teleport to the Falledge Terrace Space Anchor. Turn right and walk up to the statue. The Nymph will be on the bottom-left side of the sculpture.
- Nymph 2: From the last location, go behind the statue and use the elevator to go down. There, walk straight and head inside Spirithief Bartholos' hidden room. When you enter, turn left immediately to catch the Nymph.
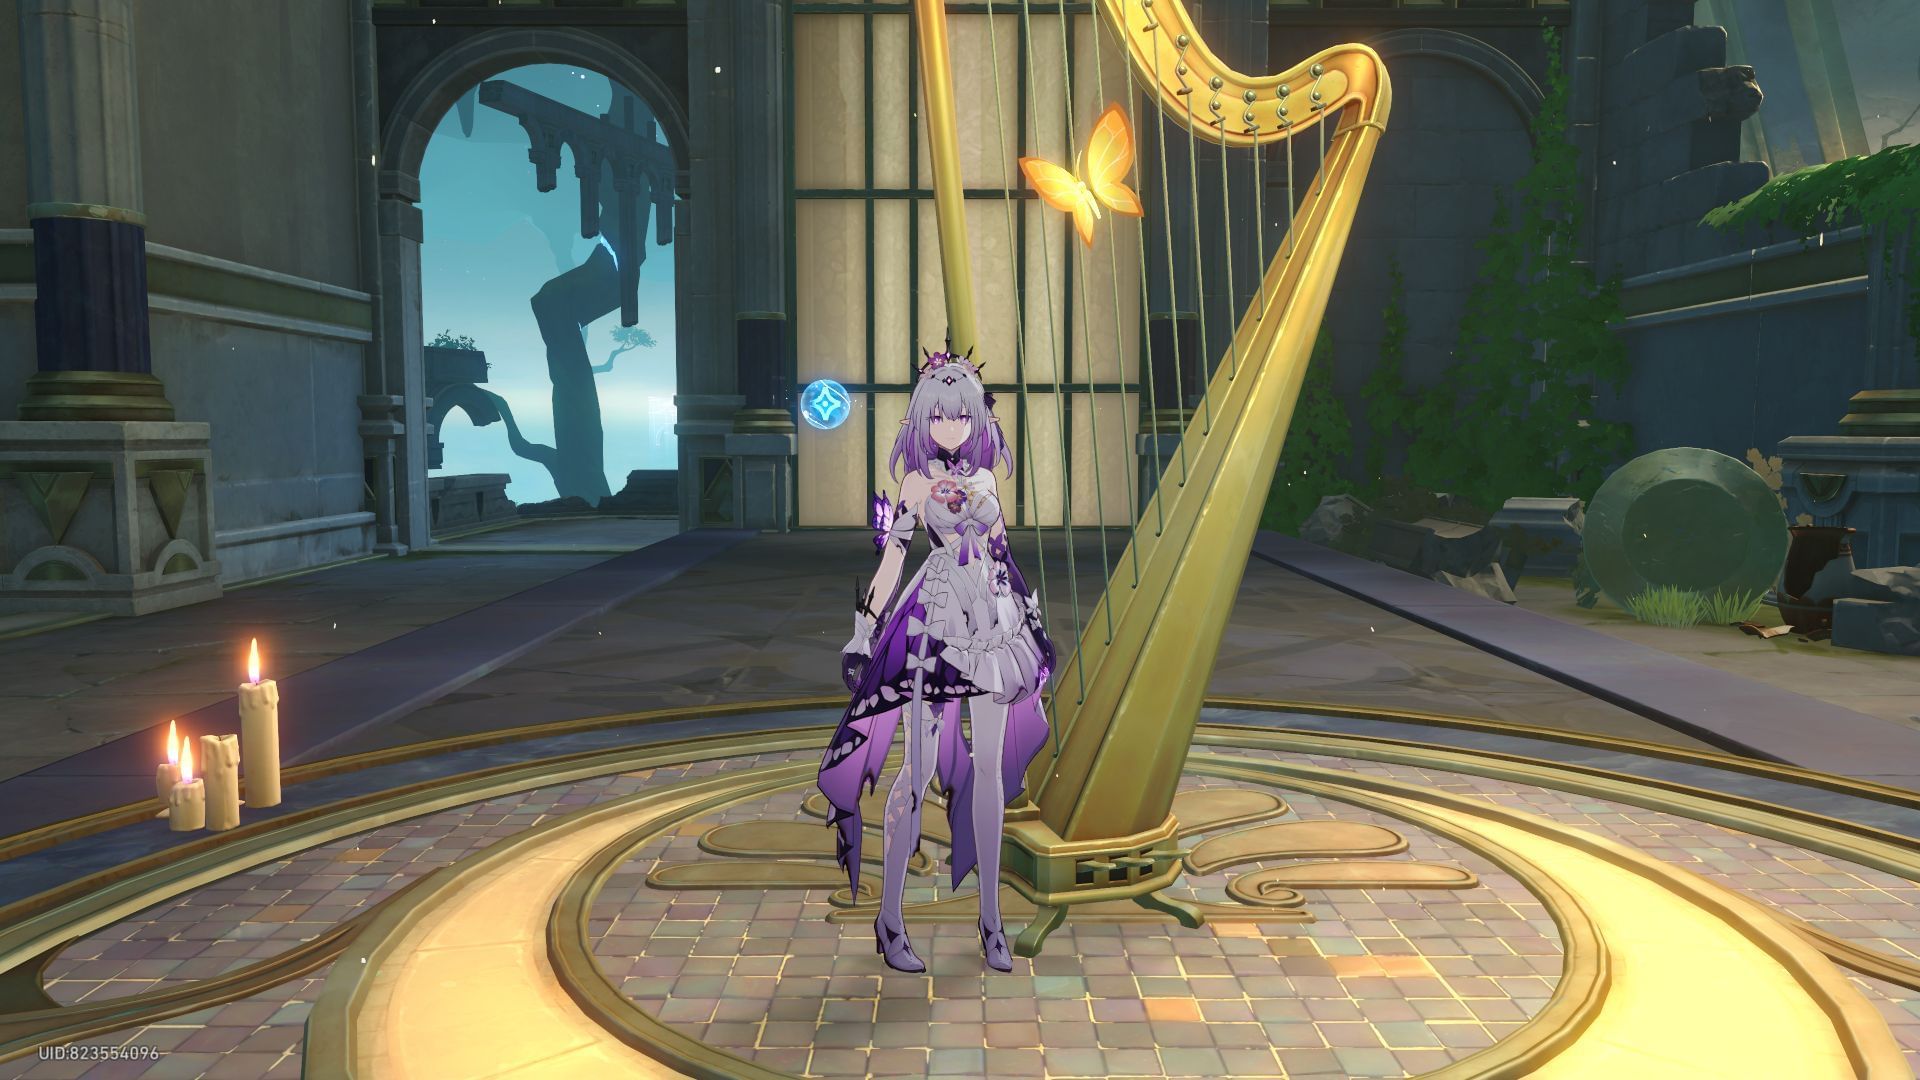
- Nymph 3: Teleport back to the previous anchor and go left instead of right this time. Walk until you reach the room with Garmentmaker. The Creation Nymph will be on the Harp.
- Nymph 4: From the Garmentmaker room, follow the passage until you reach the space with several rotating lion masks. This particular Nymph is on the blackboard.
- Nymph 5: From the last spot, turn left and walk up the stairs. The creature can be seen flying after you reach the top.
Also read: Honkai Star Rail The Dahlia ascension and trace materials leaked
Memortis Shore Ruins of Time B3 Nymph locations

- Nymph 1: Teleport to the Tenitentiary of Wishes Space Anchor in Memortis Shore Ruins of Time B2. From there, head left. After walking for a bit, turn right. There, you'll see an elevator. Use it to go down. When you get off the mechanism, use the tree branch to go right. The Nymph will be flying on top of a chessboard.
- Nymph 2: Teleport to the Sanctuary of Scythed Mind anchor. When you spawn, turn left. You'll see the Creation Nymph on a branch.
- Nymph 3: For this one, teleport to Fissure in the Myth Space Anchor and turn left. You'll see the Nymph on the right side after destroying the first set of shields.
- Nymph 4: From the last location, go back and head towards the orange crystal. The Nymph is on the top right side of the structure.
- Nymph 5: Walk back towards the shields and follow the path. After walking down the stairs, you'll see the beetle look-alike between some flowers on the left side.
Also read - Honkai Star Rail The Dahlia signature Light Cone leaked
Memortis Shore Ruins of Time B4 Nymph locations

- Nymph 1: From where you left off on the previous floor, you will see an elevator. Use it to go down. The Nymph will be on a small rock on your left.

- Nymph 2: Now, teleport to the Tomb of Woeflame Space Anchor. Turn around immediately after spawning. You will see the Nymph trying to fly away.
- Nymph 3: Head forward towards the Hidden Passage. When you are near, you'll see the creature in front of it.

- Nymph 4: For this one, use the Hidden Passage to go to the next path. After doing so, turn around to catch the last Nymph.
Also read: Honkai Star Rail 3.7 Apocalyptic Shadow, Pure Fiction, and MoC release date and time
Stay tuned to Sportskeeda for more Honkai Star Rail updates.
Are you stuck on today's Wordle? Our Wordle Solver will help you find the answer.